Hello everyone! :) My parents just moved into a new house, and I am so excited for them! Their new house is beautiful!!!!!!!! They are back in town, instead of up the mountain, so it's much easier to swing by and visit with them now. I knew I wanted to get them a little housewarming gift and make them a card, but I wasn't quite sure what to do for them. I'm pretty happy with how it turned out, and I know that they really enjoyed their gift and card... and that's what really matters! :)
Crafty Calendar Challenge- add a sentiment
Crafty Sentiments Designs- anything goes
Simply Create Too- no stamped or digital images
{PIN}spirational Challenges- anything goes
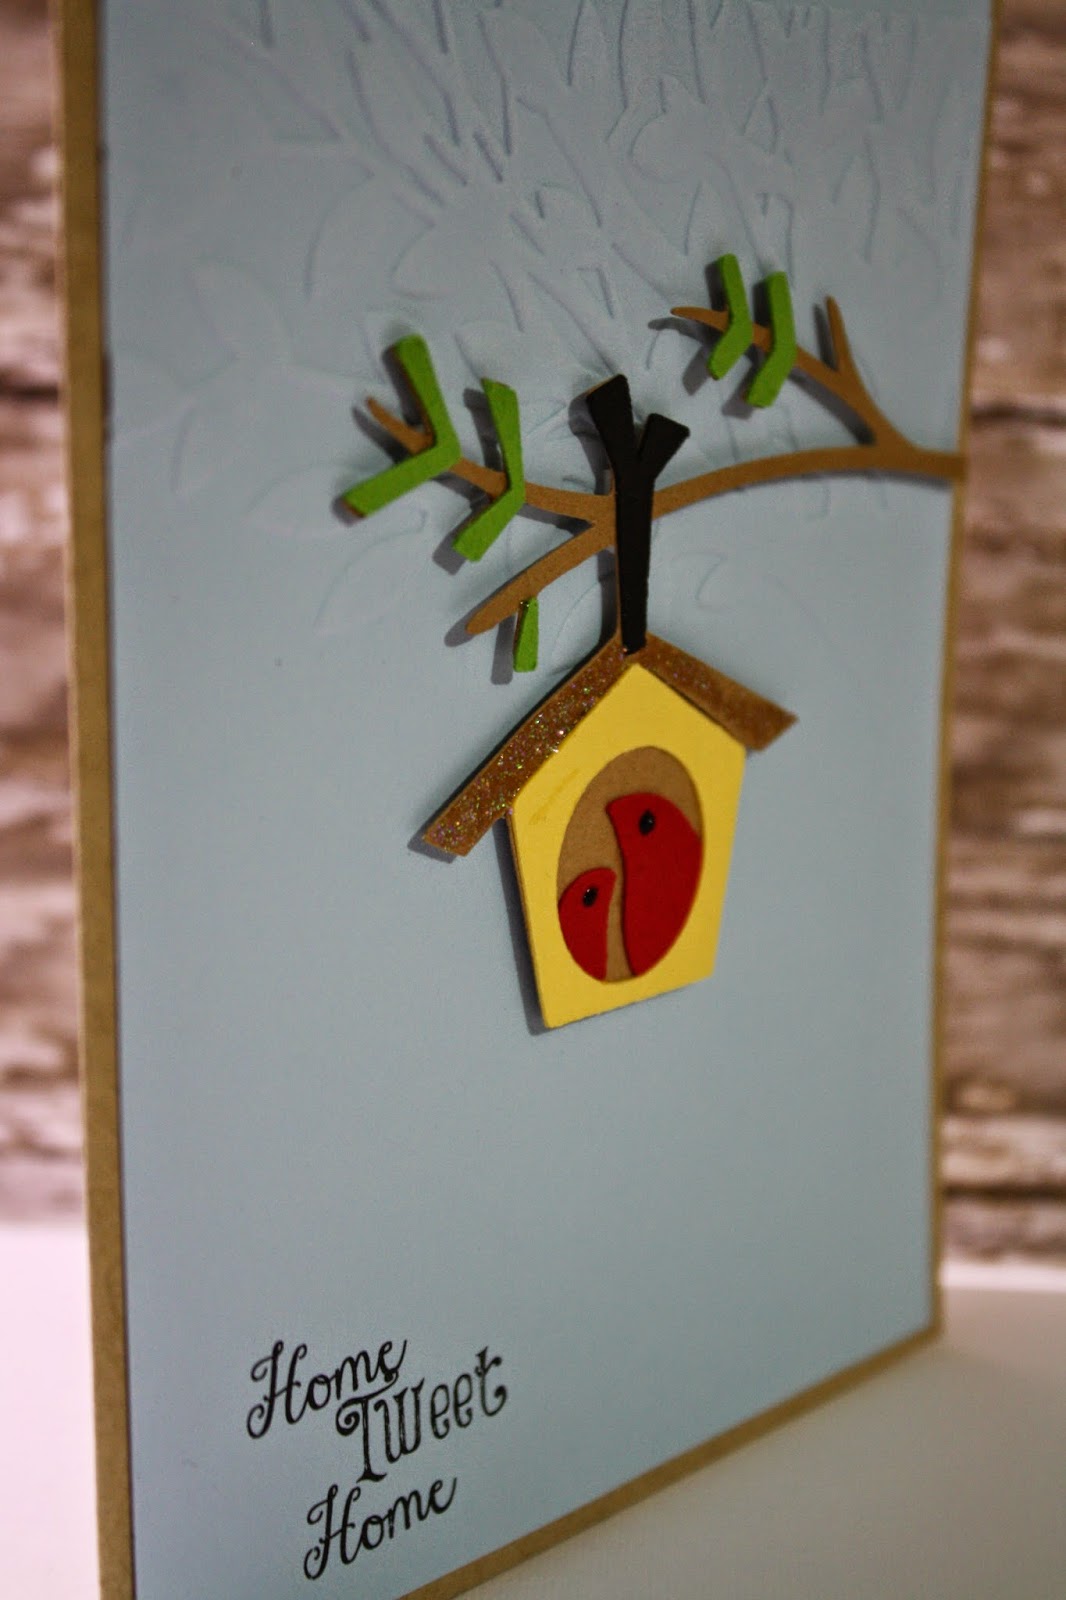
Winter Frolic- branch and birdhouse cut at 3.05"
Cuttlebug- leafy tree trunk (Darice)
Sentiment- from my computer "home" Janda Stylish Script font size 20, "tweet" Things We Said font size 20
Stickles- star dust, black diamond
Here is what I ended up doing for them as a gift. I found a cute basket at Cost Plus World Market, a dish towel, green tea, coffee, two sugar-free syrups, and I made them homemade blueberry scones. They are THE BEST scones!!! Once I discovered this recipe, I never use any other one! Give them a try, you won't be disappointed... :)
Thanks so much for stopping by and I hope you enjoyed your visit! :)
Showing posts with label Gifts. Show all posts
Thursday, April 16, 2015
Tuesday, July 16, 2013
Little Birdy Gift Card Holder
Hello everyone! I am so excited to be here with another Krafty Girls challenge! The challenge this week is: Birds of a Feather- create any paper craft with a bird theme. I LOVE birds, so this was fun for me! I also thought it was time to change things up a bit, so I made something other than a card... I decided to make a gift card holder, since that seems to be what I always give to my family and friends these days! Everybody loves gift cards...
Wedding- pillow box cut at 4.65"
3 Birds on Parade- bird cut at 1.82"
Cuttlebug- poteeka birds (The Paper Studio)
My Pink Stamper Stamps- Tweetie Hoo Puns
Joy's Life Stamps- Wintery Puns
Stickles- yellow
That's it! Thanks for stopping by!!!! Be sure to flock on over to Krafty Girls to enter the bird-themed challenge! :)
Monday, December 3, 2012
Treat Box & Caramel Recipe!!!
Hello!!! I'm telling you that it is a dangerous thing for me to have sweets in the house! I made cookies for yesterday's post and caramels for today's post, so I am surrounded by delicious things and my will-power is weak! :) I am taking the leftovers to work tomorrow, and hopefully they will be completely devoured so I don't have to bring them back home! I froze some of the shortbread cookies, and they are so yummy out of the freezer... Anywho, for today's Joy's Life DT project, we were asked to make a food project. I love making sweets, so I decided to make a little treat box and fill it with homemade caramels! Let me tell you folks, I do not like caramels from the store, but these little beauties are so delicious!!!!! At the bottom of this post I will share the recipe with you!!!! YUM!
Winter Frolic- Santa cut at 2.88", tree cut at 3.71"
Sweet Tooth Boxes- treat box/lid cut at 6.41"
Cuttlebug- snowflakes
Joy's Life Stamps- Oh Christmas Puns
Transparency film
Caramels
Okay, here's the recipe.... Soooooo good! Thanks for stopping by!!! :)
Winter Frolic- Santa cut at 2.88", tree cut at 3.71"
Sweet Tooth Boxes- treat box/lid cut at 6.41"
Cuttlebug- snowflakes
Joy's Life Stamps- Oh Christmas Puns
Transparency film
Caramels
Okay, here's the recipe.... Soooooo good! Thanks for stopping by!!! :)
Chewy Caramels
Recipe from allrecipes.com
- 1 cup butter or margarine
- 1 pound light brown sugar (about 2 1/2 cups)
- 1 (14 ounce) can sweetened condensed milk
- 1 cup light corn syrup
- 1 pinch salt
- 1 1/2 teaspoons vanilla extract
Directions
- In a heavy bottomed saucepan over medium heat, combine the butter, brown sugar, sweetened condensed milk, corn syrup and salt. Bring to a boil, stirring constantly. Heat to between 234 and 240 degrees F (112 to 116 degrees C), or until a small amount of syrup dropped into cold water forms a soft ball that flattens when removed from the water and placed on a flat surface. Cook for 2 minutes at that temperature. Remove from the heat and stir in vanilla.
- Meanwhile, butter a 9x13 inch baking pan. When the caramel is ready, pour into the buttered pan. Allow to cool completely at room temperature. Remove from the pan and cut into squares using scissors. Wrap individual pieces in waxed paper or cellophane.
Sunday, December 2, 2012
Happy Holidays Blog Hop!!!!
Hello everyone, and welcome to the Joy's Life DT Happy Holidays Blog Hop!!!! If you just hopped here from the very talented Staci, you're in the right place. To start from the beginning click HERE.
Oh, I am so excited that the holidays are here, and that Christmas is right around the corner! One thing that I love to do around Christmas is bake! The cookies that I used in this project are soooo delicious, and I will share the recipe for them at the bottom of this post! I thought it would be cute to stack the cookies in a jar to give as a gift. I love using jars! On this project I used both of Joy's Christmas stamp sets: Wintery Puns & Oh Christmas Puns!
Storybook- label cut at 1.82", 2.29"
Joy's of the Season- holly branch cut at 2.53"
Joy's Life Stamps- Wintery Puns on label, Oh Christmas Puns on the lid
1.5" circle punch
Ribbon
Jar
You're next stop on this awesome hop is Laura! Thanks for stopping by and Happy Holidays! :)
Here's the recipe for the cookies I used in this project! YUMMO! :)
White-Chocolate Cherry Shortbread Cookies
Recipe from Better Homes & Gardens
Ingredients:
Directions:- 1/2 cup maraschino cherries, drained and finely chopped
- 2 1/2 cups all-purpose flour
- 1/2 cup sugar
- 1 cup cold butter
- 12 ounces white chocolate baking squares with cocoa butter, finely chopped
- 1/2 teaspoon almond extract
- 2 drops red food coloring (optional)
- 2 teaspoons shortening
-
White nonpareils and/or red edible glitter (optional)
1.
Preheat oven to 325 degrees F. Spread cherries on paper towels to drain well.
2.
In a large bowl, combine flour and sugar. Using a
pastry blender, cut in the butter until mixture resembles fine crumbs.
Stir in drained cherries and 4 ounces (2/3 cup) of the chopped
chocolate. Stir in almond extract and, if desired, food coloring. Knead
mixture until it forms a smooth ball.
3.
Shape dough into 3/4-inch balls. Place balls 2
inches apart on an ungreased cookie sheet. Using the bottom of a
drinking glass dipped in sugar, flatten balls to 1-1/2-inch rounds.
4.
Bake in preheated oven for 10 to 12 minutes or until
centers are set. Cool for 1 minute on cookie sheet. Transfer cookies to
a wire rack and let cool.
5.
In a small saucepan, combine remaining 8 ounces
white chocolate and the shortening. Cook and stir over low heat until
melted. Dip half of each cookie into chocolate, allowing excess to drip
off. If desired, roll dipped edge in nonpareils and/or edible glitter.
Place cookies on waxed paper until chocolate is set. Makes about 60.
Stacey: http://staceyscreativecorner.blogspot.com
Jennie: http://earthyscrap.blogspot.com
Lori: http://got2bcrafting.blogspot.com
Debbie: http://bugjuiced.blogspot.com
Sarabeth: http://www.chroniclesofsarita.blogspot.com
Jenny: http://jennyplace26.blogspot.ca
Patty: http://craftykitten1.blogspot.com
Kimberly: http://hellocutiecrafts.blogspot.com
Megan: http://thoughtsoftraveling.blogspot.com
June: http://simplyelegantpapercrafts.blogspot.com
Staci: http://preciousmem.blogspot.com
Amy: http://redheadedcrafter.blogspot.com
Laura: http://www.laurascraftsandmore.com
Cyndy: http://arcyscraps.blogspot.com
Maria: http://joyfulstamper.blogspot.com
Monday, November 26, 2012
Holiday Treats Box
Hey everyone!!!! I am so excited that I finally fixed the problem I was having with Blogger!!!! This post was originally supposed to go up yesterday, but my photos wouldn't upload because apparently I have reached my storage limit... I've been hearing that this has been happening to a lot of people lately, so not really sure what's going on with that... It wouldn't let me upgrade my storage space because I was using Internet Explorer, so when I switched to using Firefox as my browser, it let me! YAHOO!!!! Okay, here is the project that was supposed to be posted yesterday for Joy's Life! Our theme was to make a gift box/bag...
Sweet Tooth Boxes- box and lid cut at 10.5"
Tags, Bags, Boxes & More- tag cut at 3.12"
Christmas cartridge- snowflakes cut at 3.59", 2.29", 1.59"
Joy's Life Stamps- Wintery Puns
MS crystal fine glitter
Rhinestones
Okay, there it is! I'm so glad I resolved my Blogger issue!!!! :) Thanks for stopping by!
Monday, November 12, 2012
Joy's Life Tags & Bags Blog Hop!
Hello and welcome to the Joy's Life Tags & Bags Blog Hop!!!! If you just hopped here from the very talented Sarabeth, you're in the right place. To start from the beginning click HERE.
I love Christmas!!! This is such a fun time of year, and I am looking forward to making homemade hot chocolate, decorating the tree, looking at lights, singing Christmas songs, etc., etc., etc.!!!! I also like to give a little something to my co-workers, and I think some Post-It's, hand sanitizer, yummy treats, etc. would fit perfectly into this little bag! :) This bag is also featuring Joy's BRAND NEW stamp set: Oh Christmas Puns! I love this set, it's full of amazing puns and it has some cute images on it!
Tags, Bags, Boxes & More- bag cut at 6.06", tag cut at 2.88"
Winter Frolic- snow angel cut at 3.24"
Doodlecharms- snowflakes on bag cut at 1.94"
Doodletype- snowflake on tag cut at 1.12"
Joy's Life Stamps- Oh Christmas Puns (on bag), Wintery Puns (on tag)
Peachy Keen Stamps- Everyday Character Face Assortment
Stickles- star dust
Twine
Okay, that's my Christmas bag! Hope we have been able to get you in the Christmas mood! :) Have a great Thanksgiving next week... Your next stop on this hop is the awesome June. Thanks for stopping by!
Joy: http://joyslife.com/
Maria: http://joyfulstamper.blogspot.com/
Cyndy: http://arcyscraps.blogspot.com/
Stacey: http://staceyscreativecorner.blogspot.com/
Laura: http://www.laurascraftsandmore.com
Jennie: http://earthyscrap.blogspot.com/
Megan: http://thoughtsoftraveling.blogspot.com
Lori: http://got2bcrafting.blogspot.com
Sarabeth: http://www.chroniclesofsarita.blogspot.com/
Amy: http://redheadedcrafter.blogspot.com/
June: http://simplyelegantpapercrafts.blogspot.com/
Patty: http://craftykitten1.blogspot.com
Sunday, November 4, 2012
Home for the Holidays Tag
Hello everyone!!!! I have been the worst blogger! I have been really busy at work (Red Ribbon Week, Halloween, report cards, etc.), and there's been a lot going on at home (all good stuff)... My sister is going to be having her baby any day now!!!! I am so excited! There's been some other nice stuff happening too, so all is good! :) Now, onto my DT project for Joy's Life. This week we were asked to create gift tags. I could really see myself making tags for each gift at Christmas! :)
Tags, Bags, Boxes and More- tag cut at 4.18"
Joys of the Season- house cut at 1.75"
Cuttlebug- swiss dots
Joy's Life Stamps- It's All Fall Puns
Stickles- star dust
White gel pen
Ribbon
Well, I hope you are all having a great weekend! Thanks for stopping by! :)
Tags, Bags, Boxes and More- tag cut at 4.18"
Joys of the Season- house cut at 1.75"
Cuttlebug- swiss dots
Joy's Life Stamps- It's All Fall Puns
Stickles- star dust
White gel pen
Ribbon
Well, I hope you are all having a great weekend! Thanks for stopping by! :)
Sunday, October 21, 2012
Halloween Hand Sanitizer
Hello everyone! Well last weekend and this week were very busy, so this weekend I am taking it easy! Yesterday I cleaned my house, and today I am going up to my parent's house for a nice dinner! You need weekends like this every now and then... :) Anywho, it's another DT day over at Joy's Life. This week we were asked to make 3D projects. I saw this idea for a hand sanitizer box on Pinterest. I think it is the cutest darn thing, and it was actually really easy to make! :) You can click HERE for instructions on how to make it.
Halloween cardstock
Joy's Life Stamps- Halloween Puns
1.5" circle punch
K & Company Halloween stickers
Small hand sanitizer
I am obsessed with hand sanitizer, so I know I would love getting this from a friend. I know my teacher friends feel the same way about hand sanitizer, so they may be getting one of these little cuties in the near future... :) Thanks for stopping by and enjoy the rest of your weekend! :)
Saturday, October 6, 2012
Halloween Blog Hop!!!
Hello and welcome to the Joy's Life DT Halloween Blog Hop! If you just hopped here from the very talented Patty, you are in the right place. To start at the beginning click HERE.
Oh man, I am so excited about this blog hop! I absolutely LOVE Halloween! It is such a fun holiday, and I think all of the decorations and everything are so cute! Every year at work, I make some kind of Halloween treat for my co-workers, so.... I wanted to make something that could hold some candy, or Post-its, etc... I found this cute little treat bag on Mini Monsters and I just had to use it (I love the little arms)!!! :)
Mini Monsters- treat bag cut at 5.35"
Joy's Life Stamps- Halloween Puns
Creepy Halloween candy (or any other treats)
Joy: http://joyslife.com/
Patty: http://craftykitten1.blogspot.com/
Amy: http://redheadedcrafter.blogspot.com
Megan: http://thoughtsoftraveling.blogspot.com/
Jennie: http://earthyscrap.blogspot.com
Cyndy: http://arcyscraps.blogspot.com/
Laura: http://www.laurascraftsandmore.com/
Stacey: http://staceyscreativecorner.blogspot.com/
Maria: http://joyfulstamper.blogspot.com/
Lori: http://got2bcrafting.blogspot.com
Sarabeth: http://www.chroniclesofsarita.blogspot.com/
Sunday, September 30, 2012
Warts Up Halloween Treat
Hello there!!!! I have been so busy, and I also got to actually talk on the phone to the that guy in Korea! He called me on Thursday, and he said that I need to have an adventure and come to Korea!!!! I actually really want to do it, but the plane tickets are so expensive! My family and friends are telling me that I would be crazy not to do it... I think it would be really exciting and fun! :) Anywho, I am so excited that tomorrow is the first day of October!!!! I LOVE Halloween! My students at school are already getting excited too... All month long we dance to my favorite Halloween music, they get to dress up on that day, I read all my favorite Halloween books to them, etc...!!! This week at Joy's Life, we were asked to create a Halloween treat project. When I was at Target one day, my niece helped me find the perfect candy to use on this project. It is so creepy and disgusting! :) Best of all, the candy has no dairy in it, so my niece can eat some of it... Okay, here's my Halloween treat...
Mini Monsters- cauldron cut at 2.53"
Joy's Life Stamps- Halloween Puns
Clear tube from Joy's Life
Creepy candy
Hope you're all enjoying your weekend! Thanks for stopping by! :)
Joy's Life Stamps- Halloween Puns
Clear tube from Joy's Life
Creepy candy
Hope you're all enjoying your weekend! Thanks for stopping by! :)
Sunday, September 9, 2012
Fall Magnetic Frame
Hello everyone!!!! I can't believe it has been over a week since I posted!!! WOW! Joy @ Joy's Life gave us the week off from crafting, so I have been doing other things to occupy my time... It was nice to take a break, but it was also nice to get back into my craft room! :) Anywho, this week we were asked to make a Fall home decor project... I made a magnetic frame to put on the fridge a while back, and I decided to make another one! This new stamp set is so stinkin' cute!
This frame fits a 4 x 6" photo
George and Basic Shapes- frame: outer rectangle cut at 7.71", inner rectangle cut at 5.35"
Home Accents- apple cut at 2.88"
Cuttlebug- d'vine swirls
Joy's Life Stamps- It's All Fall Puns
Okay everyone, I hope you're all as excited about fall as I am! Fall is my favorite season (well.... and winter too)! I just love it when the weather begins to cool down, and I love making all of my favorite baked goods!!!! :)
This frame fits a 4 x 6" photo
George and Basic Shapes- frame: outer rectangle cut at 7.71", inner rectangle cut at 5.35"
Home Accents- apple cut at 2.88"
Cuttlebug- d'vine swirls
Joy's Life Stamps- It's All Fall Puns
Cereal box
Magnetic tape
Okay everyone, I hope you're all as excited about fall as I am! Fall is my favorite season (well.... and winter too)! I just love it when the weather begins to cool down, and I love making all of my favorite baked goods!!!! :)
Monday, August 27, 2012
Fantabulous Cricut Back to School Cricut Crawl!!!!
Welcome to Redheaded Crafter and the EIGHTH Fantabulous Cricut Crawl...Fantabulous Cricut's version of a Blog Hop!
Summer is coming to an end and we are all getting ready for BACK TO SCHOOL...each Design Team member will be featuring an original BACK TO SCHOOL Project that includes a SCHOOL RELATED Item, such as crayons, rulers, pencils, book, school bus, etc. along with at least ONE Cricut Cut.
I am the first stop on the hop!!! If you've just happened across my blog and would like to play along with our Fantabulous Cricut Crawl, start HERE
Make sure to check out each DT member's blog for some awesome inspiration! There will be PRIZES along the way at our DT members' blogs, AND there will be a Grand Prize up for grabs at FCCB for one participant that submits a "Back to School" project at FCCB!
How fun is that?
Here's my project....
Fabulous Finds- clipboard cut at 2.76"
Hoot 'n' Holler- heart cut at 1.12"
Joy's Life Stamps- Holiday Occasions
Clear tube from Joy's Life
Twine
Sharpies (or anything you would want to put in the tube)
**I used this clipboard on another project, but I LOVE it so much, I wanted to use it again in a different way! :)
Now it's your turn! Let's see your BACK TO SCHOOL projects! Make sure to include a Cricut Cut somewhere on your project!
Next stop... Arin's blog!!!! Go see what she has in store for you today... And when you're done, make sure to link up your project to FCCB's Fantabulous Cricut Crawl post to be entered into the contest!
Happy Crawling!
1. Amy L: http://redheadedcrafter.blogspot.com/
2. Arin: http://apieceoflifespie.com/
3. Belinda: http://theembellishedcard.blogspot.com/
4. Cicilly: http://pinkdalmationscrapper.blogspot.com/
5. Cyndy: http://arcyscraps.blogspot.com/
6. Holly: http://www.ribbonsandglue.com/
7. Jamie: http://scrapqueen141.blogspot.com/
8. Janea: http://recollectionalley.blogspot.com/
9. Jayne: http://jayne-designs.blogspot.com/
10. Judy: http://craftyjar.blogspot.com/
11. Karen: http://simplyfrenzied-karen.blogspot.com/
12. Kate: http://smallbitsofpaper.blogspot.com/
13. Kathie: http://letsgetscrappytogether.blogspot.com/
14. Marlene: http://scrappincookie.blogspot.com/
15. Megan: http://saxeydesigns.blogspot.com/
16. Nikki: http://craftycalamities.blogspot.com/
17. Sheila: http://sheloveshoes.blogspot.com/
18. Sonya: http://sonyaspapertrail.blogspot.com/
19. Suzanne: http://cricutcraftingrammy.blogspot.com/
20. Tammy B. : http://bowmancrafts.blogspot.com/
Wednesday, August 8, 2012
Clear Pillow Box Treat
Hello everyone! I have been SUPER busy lately! Tomorrow is the first day of school, and there is a TON of work that goes into getting ready for the kiddos! Yesterday I was in meetings all day, and today is the last day to finalize my classroom! YIKES! I'm excited and nervous! :) Anywho, this week at Joy's Life we were asked to make a gift. I have been wanting to use this clear pillow box, and this was the perfect opportunity! :)
Easy peasy! No Cricut on this project!!!! Thanks for stopping by! :)
Joy's Life Stamps- Tag You're It Set Two
Clear pillow box from Joy's Life
MS border punch
Prima flowers
1.5" & 2" circle punches
White strip 3" wide, patterned strip 2", pink strip 1.5"
Easy peasy! No Cricut on this project!!!! Thanks for stopping by! :)
Subscribe to:
Posts (Atom)