Showing posts with label Techniques/Tips. Show all posts

Sunday, December 9, 2012

Cold Hands, Warm Heart Tag

Hello!!!!!  I am so shy about my post today!  For the Joy's Life DT we are supposed to share a tip or technique with our project...  Well...  I am not the best at giving tutorials/tips...  I find that a little sad, seeing that I am a teacher!!!!  I also couldn't think of what I could possibly give a tip about, but then it clicked...  Fuzzy Fun Flock!  I'm going to show you how I use this awesome stuff...  Okay...  here it goes...


Tags, Bags, Boxes & More- tag cut at 4.06"
Winter Frolic- snowman cut at 3.24"
Hoot 'n' Holler- heart cut at 1.24"
Joy's Life Stamps- Oh Christmas Puns
Fuzzy Fun Flock- envious green & chili pepper red

Okay, here's my "tip"...

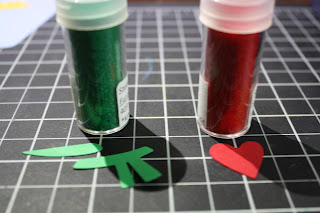
These are the supplies you'll need to make something "fuzzy" (a.k.a. super adorable).  I use my Xyron sticker maker, with permanent adhesive. 

You'll want to choose a cardstock color that is similar to the color of the Fuzzy Fun Flock you want to use.  White cardstock with a colored flock just doesn't look as nice...  I'll show you an example in a bit....


Run the pieces that you want to flock through the sticker maker, upside down.  Once that is done, I make sure to rub the back of the pieces with something hard (I used the fun flock bottle) to make sure that all of the adhesive is sticking to the other side. 


Peel the pieces off of the adhesive paper and just "dump" on the fun flock (like my technical term there?!?).  Then I rub the entire piece with my finger to make sure the flock is sticking to the image and is completely covering all of the adhesive.  Then you just tap off the excess (just like using glitter).  VOILA!  You're done, you have made something fuzzy!  Just use the pieces on your project any way you want!!!!

This is an example of why you want to use a colored cardstock, not white.  The left was done with white cardstock, and the right was done with the red cardstock.  To me, it just looks so much better with the colored cardstock...  :)

That's all there is to it!  I hope you found that somewhat helpful...  Thanks for stopping by!!!  :)

Tuesday, July 19, 2011

Making Paper Roses

Hey everyone!  After I made paper roses for a birthday card, I had a lot of people ask how to make them.  I did not come up with this formula for making these roses.  I watched a video at http://www.youtube.com/watch?v=edApDLVUWSw.  The crafter's name is Kathy and her website is http://www.paperphenomenon.blogspot.com/.  She has some awesome creations on there!  :)  Since I know some people follow step by step pictures better than a video, I have followed Kathy's steps and I am going to outline them for you in this post....  Cool!  :)

These are the supplies you will need:  hot glue gun, scissors, something to curl your petals back (I used my Gypsy stylus), 3 flowers (cut at 2.75" from George and Basic Shapes using the Shadow/Blackout feature).  You can use any size flowers you would like, but all 3 need to be the same size.


You are then going to cut 1 petal from the first flower (and throw that one petal away), and cut 2 petals from the second flower (do not throw those petals away).


You will be left with 5 pieces in all: a flower missing 1 petal, a flower missing 2 petals, an intact flower, and the 2 petals you cut off (they are kind of shaped like a heart).  Take the intact flower and make an "x" in the center with your scissors.  You are then going to make the "cones" using your cut flowers.  You roll them in on themselves forming a "cone" where two of the petals are overlapping exactly, and you hot glue them together.  The smallest piece (the heart shaped piece) needs to be rolled in on itself.  Just start on one end and roll it until you get a look you like and hot glue it, this will be the center of your finished rose.  Your flower that had 3 petals will now look like it has 2, the flower with 4 petals will now look like it has 3 petals, etc.  The intact flower does not get rolled into a "cone".


Now you need to roll the edges of your flowers.  I used the stylus from my Gypsy (like I saw in the video).  You need to curl the edges of all of your flowers, from the tiny center piece to the large flower with the "x" in the middle.


Now it's going to start looking like a rose!  Take the big flower with an "x" and put some hot glue around the center.  Take the "cone" that has 3 petals and push it through the "x".  Apply more hot glue to the center of the "cone" with 3 petals, and then push the "cone" with 2 petals into the center.  Then you will be left with the last piece that will be the center of your rose.


Turn your rose over and snip off the bottom.  This will give you a bigger area to push the center of your rose through.  Turn the rose back over, put some hot glue in the middle and push through the last "cone" that will be the center of your rose.  VOILA!  You have a finished rose!  :)  You can snip off the back again to make it more flat to adhere it to cards or scrapbook pages.  I adhered my roses to my card by using hot glue. 


I hope this tutorial helps someone out there!  These sure were fun to make and I think they look almost real! :)  Make sure to check out the video, Kathy does a great job of explaining the steps.  See ya later!

Monday, July 18, 2011

You're Tops in my Book Card

Hey everyone!  The idea for this card just popped into my brain during the car ride on the way home from Monterey!  I knew the challenge at Cricut 360 was to do something for your parents, but I had no idea what I was going to do...  Well, when you're driving for hours, you get to do a lot of thinking!  :)  I like the way this turned out, it looks almost like it did in my head....  I will definitely be sending this to my parents because they are the best parents ever!!!!  They pretty much paid for the trip to Monterey, they are always supportive of my sister and me, and they just rock!  :)

Cricut 360- create something for the parents
Frosted Designs- use a quote (I've heard people say this before)
GAB Challenge- use something you rarely use (Graphically Speaking cart. & the wobble springs)
Whimsical Wednesday- interactive fun (I used springs under the tops, so they wiggle a lot)
365 Cards- add dimension to your project


Graphically Speaking- book card base cut at 4.29"
Joys of the Season- ornament (I used to make tops) cut at 2.53"
Cuttlebug- d'vine swirls
Peachy Keen Stamps- Retro Paper Doll Face Assortment
Sentiment is from my computer- HP PSG font at size 18
Stickles- star dust, cotton candy, lime green
Glossy Accents
Wire to make the springs

**  I used the search feature on my Gypsy to find a top and the only cartridge that has one is Boys Will be Boys.  I don't own that cartridge so I started thinking about other things that may resemble a top, and that's when ornaments popped into my brain!  I used the ornament from Joys of the Season, cut each one 3 times (so I could layer the different colored papers), cut off the top of the ornament and the little ball on the bottom, and VOILA it's a little spinning top!  :)

**  I had been hearing that you can use Action Wobbles to create movement on your cards, but I didn't have any.... so, I made my own.  They are not exactly the same as the Action Wobbles, but they are really fun!  To make them I just cut some wire, wrapped it around a pen, and used Scotch tape to adhere it to the little tops and then to the card. 


Hope you enjoy, and you're all tops in my book too!  :)

Monday, June 13, 2011

Making an Accordion Flower

Hey my blogging buddies!  I just wanted to say a BIG "thank you" to all of the people who are leaving comments, and to those who are becoming followers!!!!  Every day that I turn on the computer and see that I have another follower (or comment), I get so excited!!!  Anywho...  Dawn asked me how I made the accordion flower for my butterfly birthday card. :)  There may be easier ways out there, but this is what I did.....

I cut a strip of white cardstock measuring 1 1/2" x 8 1/2". 


Then I used my Martha Stewart scoring board (I love this thing!) to score the paper every 1/4".


The last score mark leaves you with a piece that isn't exactly 1/4", so I cut that one off with my scissors.


Start folding your paper "accordion style" (not sure how to say that) until the entire strip has been folded.


Glue the two ends together so that you have a circle like this.  I used my Tombow tape runner to do this.


Start pushing the top down until it lays flat.  It will keep popping back up, so you'll have to hold it down with your hand.


I tore a small piece of white cardstock and glued it to the back of the flower.  It needed to be held down for a while, so I placed one of my MS punches on top.


Once it was dry I used my Crop-a-Dile to punch a hole in the middle, added a brad, and then used a glue dot to adhere it to the card.


 Hope this was helpful! :)