Showing posts with label Stamped Background. Show all posts

Monday, September 10, 2012

Blast Off Rocket Card

Hello everyone!  This is my 200th post!  I can't believe I took such a long break from my blog, then I come back with two posts in a row, and one of them is the big 200!  :)  I have been very busy ever since school started back again...  I also met a nice guy, but the timing is not ideal!  I actually ended up meeting him 4 days before he left the country to go teach English!  We have been emailing back and forth, but I'm not sure if it will end up going anywhere...  Would be nice if it did!  :)  Anywho, it's another challenge day over at Fantabulous CricutThe challenge this week is:  Trains, Plains, and Automobiles- make a project with some sort of transportation


*I tried to get a picture that shows the shimmery background...

Everyday Paper Dolls- rocket cut at 4.29", UFO cut at 1.35"
Recollections- Robots stamp set
Stickles- star dust, orange peel
Glossy Accents
Embossing powder
MS ink
Glimmer mist

For this card I made my own background paper.  That is so fun to do!  :)  Thanks for stopping by, and I hope you'll join in the fun over at Fantabulous Cricut!

Monday, July 23, 2012

CAS Wedding Card

Hello everyone!  Had a wonderful day shopping for "teacher stuff" on Saturday, and then we had a great time at our family/friend's house last night!  We swam, ate yummy stuff, did lots of chatting, AND we got to see our friend Robin's craft room!!!!  Her craft room is a-maz-ing!!  She's also working on an adorable album for my sister & my soon to be little niece!  So fun!!!  Anywho, it's Monday, which means it's time for another challenge at Fantabulous Cricut!!!!  The challenge this week is:  Wedding Bliss- make a project for a special couple (wedding, anniversary).  This really was challening for me!  I don't know why, but I have the toughest time making wedding cards...  I love wedding cards, but I just seem to draw a complete blank whenever I'm asked to make one!  I decided to make something CAS, and I really like the end results...


This is a 4" square card
Wedding Cartridge- couple cut at 2.76"
Sentiment: Inkadinkado Stamp Set- Friendship
Background stamp- Hampton Art
Stickles- lime green

Thanks so much for stopping by!  "I do" hope you'll stop by Fantabulous Cricut and link up your wedding projects!  :)

Tuesday, April 24, 2012

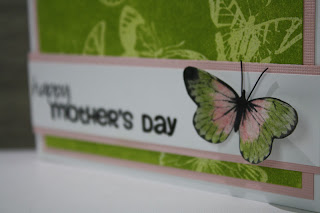
Mother's Day Butterfly Card

For the Teacher Gifts Blog Hop click HERE!

For the Fantabulous Cricut post click HERE!

Hello there everyone!  I am so excited that it's time for another challenge at Krafty Girls!  Yahoo!  The challenge this week is to create something for Mother's Day.  Believe it or not, I did not use the Cricut on this project!!!!!!  I know, I know...  It's shocking!  I like making my own patterned paper by stamping the image, embossing it, and then rubbing ink over the entire paper...  It's really fun, and I like the effect that it gives!  :) 


5" square card
Joy's Life Stamps- Everyday Occasions "happy", Holiday Occasions "Mother's Day"
Martha Stewart Butterfly Stamps
A la Mode- sparkle embossing powder
ColorBox Ink Pad- moss green
Black beading wire (for the antennas)
Prismacolor Pencils

That's it!  This card was super simple to make, and I hope you like it!  Be sure to stop by Krafty Girls and link up your beautiful Mother's Day projects!  :)

Tuesday, March 13, 2012

Flower Box, Krafty Girls Challenge #3

Hello there everyone!  Today is a new challenge over at Krafty Girls!  I'm so excited to be on this Design Team, the challenges are so fun!  This week the challenge is Get Growing- create a project with a handmade flower on it...  I just bought the Flower Shoppe cartridge and I couldn't wait to use it on this project.  I was a bit confused as to how to size this flower, and how to put it together, but I think I figured it out...  :)  I would put candies in this box, or you could put a cupcake in there...  It's a pretty versatile box!  :)


Flower Shoppe- flower cut at 4.10"
Sweet Tooth Boxes- box and scalloped lid cut at 10.5"
Cuttlebug- birds and swirls
Hero Arts- Trees, Birds, & Messages Stamp Set (sentiment)
Stampendous- April Shower Flowers Stamp Set (flowers)
Clear embossing powder
Martha Stewart Ink- ocean
Prima Flower
Blingy brad
Ribbon
Twine

***I created my own paper for the box by stamping and heat embossing the flowers, then I rubbed the MS ink on it. 

Enjoy, and I hope to see you link up over at Krafty Girls!  :)

Wednesday, January 18, 2012

Snowman Birthday Card

Hello and Happy Wednesday everyone!  I am so excited that the work week is halfway over!  :)  I had a really difficult time making a snowman birthday card (not sure why)...  I actually like the way the card turned out, so I was glad that I challenged myself...  Making birthday cards makes me think about all of the birthdays that are coming up: my sister's, my niece's, and my *gulp* 30th birthday next month!!!  I am actually excited about turning 30, well...  we'll see how I feel about it next month!  Hee hee...  :)  Anywho, here is my take on a winter birthday card.

FCCB- use snowflake or snowman
My Craft Spot- "snow much fun" use a snowflake or snowman
Cuttlebug Spot- winter
Perfect Sentiments- birthday card using embossing resist
The Paper Variety- use a fan fold embellishment (I think these wrappers count)
She's a Sassy Lady- birthday card
Getting Cricky- let it snow, use embossing
Crafting for All Seasons- snowflake or snowman
Birthday Sundaes- use the photo for inspiration


A2 sized card
Winter Frolic- all snowmen cut at 2.29"
Sweet Treats- cupcake wrappers cut at 2.06"
Cuttlebug- seeing spots
Peachy Keen Stamps- winter face assortment
Sentiment, computer generated:  Curlz MT font at size 20
A la Mode- sparkle embossing powder
Cupcake and snowflake stamps
MS ink- ocean
Prismacolor pencils for the noses and cheeks

*I accordion folded the cupcake wrappers by scoring them on my MS scoring board and then folding them.  I attached tabs to them on my Gypsy by using a rectangle from George and Basic Shapes.  I was then able to fold the tabs behind the snowmen to keep them in their wrappers.

Hope you enjoy the rest of your week!  Bye y'all!!!  :)

Friday, July 29, 2011

Hello Kitty Air Mail

Hello everyone!  The last few days have been really busy for me!  Yesterday my in-laws came over and it was really fun!  I hadn't seen them in a while, and it was nice to visit with them, see my niece and nephew, etc....  Today I went shopping at the teacher store and spent more money on my classroom!  There never seems to be a school year where I am not spending a lot of money on  my class!  Oh well, I really love it, so it's okay!  :)  Anywho I made this simple card to enter into a couple of challenges and I was just feeling the red, white, and blue vibes.....  I am also excited because I received my twine from My Craft Spot and I just had to use it!!!!  :)

M.A.G. Challenge by the Page- Hello Kitty pg. 65 only
Cricut 360- transportation
Woodware USA- stamped background
Getting Cricky- for the troops
Cricut Cardz- anything goes
Party Time Tuesdays- anything goes


A2 sized card
Hello Kitty Greetings cartridge- Kitty and her plane cut at 3.47"
Making Memories- Passport Stamp Set (used on background too)
A la Mode sparkle embossing powder
Versamark Ink
Twine
Stickles- Christmas red, yellow
White gel pen

There it is!  Hope you enjoy it!  :)  I also want to thank everyone for all of the nice comments you leave for me....  I read every single one of them and they make me so happy!  :)

Tuesday, July 26, 2011

Easy Peasy, Lemon Squeezy Card

Hello everyone!  It's been so hot around here!  It definitely does inspire some of my cards, like this one!  I love drinking homemade lemonade on a hot day....  It's so refreshing!  I was also inspired by my new Scrappy Moms Stamps!!!!!  I would highly recommend these to anyone!  They are such nice quality and they smell good (just like MPS stamps)....  :)  This sentiment is awesome, and my students and I actually say this all the time!  :)  Since it is so hot today, I will share my favorite recipe for lemonade!  Look for it at the end of this post...  As always, don't forget to enter my giveaway ------>here<------- if you haven't already....  :) 

Frosted Designs- use buttons
Our Creative Corner- use the 4 B's (black, bling, buttons, bows)
FCCB- use a melon or another fruit
Woodware USA- stamped background
365 Cards- stamp your sentiment all over the background
Use it Tuesday- use two hoarded items (I used the beads and the black jute cord for the first time)
Papercraft Star- anything goes


A2 sized card
Savory cartridge- pitcher cut at 4.06", lemon cut at 1.82"
Scrappy Moms Stamps- A Pinch & a Dash
MS pigment ink- ocean
Stickles- star dust
A la Mode sparkle embossing powder
Clear beads
Jute cord- black
Buttons

*I stamped the sentiment multiple times on white cardstock using VersaMark ink.  I then embossed it with the sparkle embossing powder and used my heat tool to set it.  Then you can just rub ink over the entire piece of cardstock and the ink won't stick to the embossing!  Sooo cool!  :)  I think it actually made a pretty neat looking background....

Okay, as promised, here is my favorite recipe for lemonade!  I did not come up with this recipe.... I found it on allrecipes.com.  Mmmmmm.... So refreshing!!!

Best Lemonade Ever


Ingredients:
1 3/4 cups white sugar
8 cups water
1 1/2 cups lemon juice

Directions:
1.  In a small saucepan, combine sugar and 1 cup of water.  Bring to a boil and stir to dissolve sugar.  Allow to cool to room temperature, then cover and refrigerate until chilled.
2.  Remove seeds from lemon juice, but leave pulp.  In pitcher stir together chilled syrup, lemon juice, and remaining 7 cups of water.

It's just that "easy-peasy, lemon squeezy"!  Enjoy!  :)

Friday, July 22, 2011

Penguin Spinner Christmas Card

Good morning everyone!  I must start off by saying....  WOOO HOOOO!!!!  I have reached 200 followers!  I am going to do a giveaway of some kind, so keep your eyes peeled for that!  :)  It will be my first giveaway, so I'm a bit nervous (not sure why)....  But, I really want to do this because I want to say THANK YOU to all of the people who are taking the time to visit and follow my blog!  I can't believe that with all of the talent out there, my little blog reached 200!!!  Okay, onto my card for today...

Bitten by the Bug 2- use a penguin (I don't own Jolly Holidays, so I used Joys of the Season)
My Craft Spot- Christmas in July
Jingle Belles- O Hole-y Night: create a card with a window in it (I love the name of this challenge) :)
Paper Cutz Challenge- anything goes
Peachy Keen LFIF Challenge- use a pun (I LOVE puns) and a PK face


Cricut cartridges used:
Joys of the Season- penguin cut at 3.35"
Wild Card- card base cut at 5.59"
Winter Woodland- snowflakes cut at 1", 1.55", 1.86"
Peachy Keen Stamps- Critter Faces SET A Medium & Winter Face Assortment
Sentiment from my computer- Curlz MT font, size 18
Martha Stewart Ink: sea lavender & ocean
Mini snowflake stamp
A la Mode sparkle embossing powder
Martha Stewart fine glitter- crystal
Brad for the spinner
Foam tape

**I'm so excited because I made my own background paper!  To make it I stamped a mini snowflake (I don't even know the brand of the stamp) with Versamark Ink in various places on the white paper.  Then I sprinkled the embossing powder over it and heat embossed the snowflakes.  I then took my MS sea lavender ink and dabbed it over the entire card (and it doesn't stick to the embossed images).  I inked the edges of the card with MS ocean ink.

Before I end this post, I want to thank Cally Ann @ http://callyanncraftycreations.blogspot.com/ for giving me a blog award!!!!  She has a really cute blog, and posts really nice projects.  I would encourage you all to check her out! :)  You can see my original post for this award here.  Thanks again!


Okay, I snow you will have a cool day!  Thanks for stopping by!!! :)