Showing posts with label Tags Bags Boxes and More. Show all posts

Sunday, December 9, 2012

Cold Hands, Warm Heart Tag

Hello!!!!!  I am so shy about my post today!  For the Joy's Life DT we are supposed to share a tip or technique with our project...  Well...  I am not the best at giving tutorials/tips...  I find that a little sad, seeing that I am a teacher!!!!  I also couldn't think of what I could possibly give a tip about, but then it clicked...  Fuzzy Fun Flock!  I'm going to show you how I use this awesome stuff...  Okay...  here it goes...


Tags, Bags, Boxes & More- tag cut at 4.06"
Winter Frolic- snowman cut at 3.24"
Hoot 'n' Holler- heart cut at 1.24"
Joy's Life Stamps- Oh Christmas Puns
Fuzzy Fun Flock- envious green & chili pepper red

Okay, here's my "tip"...

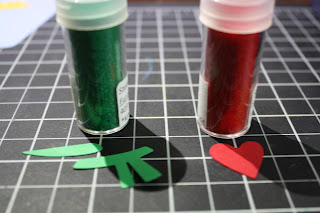
These are the supplies you'll need to make something "fuzzy" (a.k.a. super adorable).  I use my Xyron sticker maker, with permanent adhesive. 

You'll want to choose a cardstock color that is similar to the color of the Fuzzy Fun Flock you want to use.  White cardstock with a colored flock just doesn't look as nice...  I'll show you an example in a bit....


Run the pieces that you want to flock through the sticker maker, upside down.  Once that is done, I make sure to rub the back of the pieces with something hard (I used the fun flock bottle) to make sure that all of the adhesive is sticking to the other side. 


Peel the pieces off of the adhesive paper and just "dump" on the fun flock (like my technical term there?!?).  Then I rub the entire piece with my finger to make sure the flock is sticking to the image and is completely covering all of the adhesive.  Then you just tap off the excess (just like using glitter).  VOILA!  You're done, you have made something fuzzy!  Just use the pieces on your project any way you want!!!!

This is an example of why you want to use a colored cardstock, not white.  The left was done with white cardstock, and the right was done with the red cardstock.  To me, it just looks so much better with the colored cardstock...  :)

That's all there is to it!  I hope you found that somewhat helpful...  Thanks for stopping by!!!  :)

Monday, November 26, 2012

Holiday Treats Box

Hey everyone!!!!  I am so excited that I finally fixed the problem I was having with Blogger!!!!  This post was originally supposed to go up yesterday, but my photos wouldn't upload because apparently I have reached my storage limit...  I've been hearing that this has been happening to a lot of people lately, so not really sure what's going on with that...  It wouldn't let me upgrade my storage space because I was using Internet Explorer, so when I switched to using Firefox as my browser, it let me!  YAHOO!!!!  Okay, here is the project that was supposed to be posted yesterday for Joy's Life!  Our theme was to make a gift box/bag...


Sweet Tooth Boxes- box and lid cut at 10.5"
Tags, Bags, Boxes & More- tag cut at 3.12"
Christmas cartridge- snowflakes cut at 3.59", 2.29", 1.59"
Joy's Life Stamps- Wintery Puns
MS crystal fine glitter
Rhinestones

Okay, there it is!  I'm so glad I resolved my Blogger issue!!!!  :)  Thanks for stopping by!

Monday, November 12, 2012

Joy's Life Tags & Bags Blog Hop!


Hello and welcome to the Joy's Life Tags & Bags Blog Hop!!!!  If you just hopped here from the very talented Sarabeth, you're in the right place.  To start from the beginning click HERE.

I love Christmas!!!  This is such a fun time of year, and I am looking forward to making homemade hot chocolate, decorating the tree, looking at lights, singing Christmas songs, etc., etc., etc.!!!!  I also like to give a little something to my co-workers, and I think some Post-It's, hand sanitizer, yummy treats, etc. would fit perfectly into this little bag!  :)  This bag is also featuring Joy's BRAND NEW stamp set: Oh Christmas Puns!  I love this set, it's full of amazing puns and it has some cute images on it!


Tags, Bags, Boxes & More- bag cut at 6.06", tag cut at 2.88"
Winter Frolic- snow angel cut at 3.24"
Doodlecharms- snowflakes on bag cut at 1.94"
Doodletype- snowflake on tag cut at 1.12"
Joy's Life Stamps- Oh Christmas Puns (on bag), Wintery Puns (on tag)
Peachy Keen Stamps- Everyday Character Face Assortment
Stickles- star dust
Twine

Okay, that's my Christmas bag!  Hope we have been able to get you in the Christmas mood!  :)  Have a great Thanksgiving next week...  Your next stop on this hop is the awesome June.  Thanks for stopping by!

Joy: http://joyslife.com/
Maria: http://joyfulstamper.blogspot.com/
Cyndy: http://arcyscraps.blogspot.com/
Stacey: http://staceyscreativecorner.blogspot.com/
Laura: http://www.laurascraftsandmore.com
Jennie: http://earthyscrap.blogspot.com/
Megan: http://thoughtsoftraveling.blogspot.com
Lori: http://got2bcrafting.blogspot.com
Sarabeth: http://www.chroniclesofsarita.blogspot.com/
Amy: http://redheadedcrafter.blogspot.com/
June: http://simplyelegantpapercrafts.blogspot.com/
Patty: http://craftykitten1.blogspot.com

Sunday, November 4, 2012

Home for the Holidays Tag

Hello everyone!!!!  I have been the worst blogger!  I have been really busy at work (Red Ribbon Week, Halloween, report cards, etc.), and there's been a lot going on at home (all good stuff)...  My sister is going to be having her baby any day now!!!!  I am so excited!  There's been some other nice stuff happening too, so all is good!  :)  Now, onto my DT project for Joy's Life.  This week we were asked to create gift tags.  I could really see myself making tags for each gift at Christmas!  :)


Tags, Bags, Boxes and More- tag cut at 4.18"
Joys of the Season- house cut at 1.75"
Cuttlebug- swiss dots
Joy's Life Stamps- It's All Fall Puns
Stickles- star dust
White gel pen
Ribbon

Well, I hope you are all having a great weekend!  Thanks for stopping by!  :)

Tuesday, August 14, 2012

Berry Best Strawberry Card

Hello out there!  Well, the first few days of school have gone pretty well!  I am so thankful that there were no major catastrophes the first day (especially at dismissal time)...  I didn't have any clingy parents, no crying students, and everyone made it home safely after school!  :)  WHEW!  I am also really having fun with my niece in my class!  She is so dang smart, it actually shocks me from time to time!  :)  Anywho, this week at Joy's Life we were asked to use an "oldie but goodie" stamp set.  I LOVE Yummy Puns, so I knew I wanted to use it on my project...


Country Life- strawberry cut at 4.88"
Tags, Bags, Boxes and More- tag cut at 2.41"
Joy's Life Stamps- Yummy Puns
Eyelet
Twine

I wish you the "berry best" day, and thanks for stopping by!  :)

Wednesday, June 20, 2012

Get Well Soup Mix in a Jar

Hi there!  Today I have a fun project for you that is not a card!  I have to admit I have a little obsession with gifts that you can give in a jar...  I don't know why, but I really love things that come in jars!  I think they look so cute, they are easy to make, and they make people feel special!  So today, our DT challenge at Joy's Life was to create a project with a tag on it...  As soon as I saw this sentiment, I knew I had to make a soup mix in a jar!  I actually made these for Christmas a couple years ago.  The soup tastes really good, but people don't want to use it because it looks too pretty!  I will post the recipe at the bottom of this post, just in case you want to try giving this to someone too...  :)


Tags, Bags, Boxes & More- tags cut at 4.53", 3.94"
From My Kitchen- bowl cut at 2.18"
Joy's Life Stamps- Tag You're It: Set Two
Jute cord
Wide-mouth jar
Friendship Soup Mix (recipe below)

Well folks, there's my project with a tag on it!  I think this would really brighten someone's day...  I didn't have all of the ingredients for the soup mix, so I improvised!  :)  Thanks for stopping by!

Friendship Soup Mix in a Jar
1/3 cup beef bouillon granules
1 tablespoon freshly ground black pepper
1/4 cup dried minced onion
1/2 cup green or yellow dried split peas
1/4 cup wild rice
1/3 cup long-grain white rice
1/2 cup red or brown lentils
1/2 cup elbow macaroni
1 to 1 1/4 cups tri-colored corkscrew pasta (or enough to fill jar)

1.  Layer ingredients in order given into 1-quart wide-mouth jar with tight-fitting lid.  Pack down firmly after each layer.  Seal jar.

Friendship Soup
*Attach these instructions to the jar when you give it to someone.

1 jar Friendship Soup Mix
6 cups reduced-sodium vegetable stock
6 cups water
1/2 to 1 pound ground beef or turkey, browned and drained (optional)

1.  Remove colored pasta from jar; set aside.

2.  Pour stock and water into 5- to 6-quart saucepot.  Bring to a boil over high heat, stirring occasionally.  Add remaining contents of jar; return to a boil.  Reduce heat to a simmer.  Cover; simmer 20 to 30 minutes or until rice, lentils, and peas are tender.

3.  Add colored pasta and meat, if desired, to soup.  Return to a boil, stirring occasionally.  Reduce heat to a simmer.  Cover; simmer 10 to 15 minutes longer or until pasta is done.  Refrigerate leftovers.
Makes 12 servings
 
*Recipe from www.pilcookbooks.com

Wednesday, February 15, 2012

Conversation Hearts Valentine Coupons

Hello everyone!!!  I hope everyone had a good Valentine's Day yesterday!  My day was wonderful!  My students were so adorable, and they could hardly wait until after lunch to pass our their Valentines!  They kept asking me all day if it was time...  They showered me with gifts, and I felt really spoiled!!!  One of my kids said that "I spoil them, and they spoil me"!  How cute!  :)  I then went up to my parents and had a nice dinner with my family....  Can't complain about that!

Yesterday I was doing a candy heart graphing activity with my students and the idea for this Valentine popped into my head!  It was like a beautiful candy lightbulb going off over my head, and I don't care that Valentine's Day is over, I had to make it!!!! :)  On the back of the little hearts I would write down little love notes, or coupons that you can give to your sweetie!  For example, I would write "good for one movie night of your choice", etc....  Hope you enjoy!!! 

Be sure to enter my GIVEAWAY!  :)

My Pink Stamper Blog Hop- use red, a circle, pink ribbon, more than 1 MPS stamp, a die cut
The Cuttlebug Spot- use hearts and a stamp
Little Scrap Pieces- anything your heart desires
Die Cuttin' Divas- choose at least two of these colors: red, pink, white, black
Celebrate the Occasion- Valentine's, use a heart
Paper Playtime- Cricut creation with hearts or love theme


Tags, Bags, Boxes, and More- box cut at 4.18"
Create a Critter- candy hearts cut at 2.18", heart window cut at 2.12"
Paisley- "sweetheart" cut at .61"
Doodletype- "for my" cut at .69"
Mini Monograms- scalloped circle cut at 3.06", red circle cut at 3.31"
Cuttlebug- doodle hearts (on the transparency), swiss dots
My Pink Stamper Stamps- Love-alicious
Pink ribbon
Transparency film

Okay everyone!!!  Hope you enjoyed my little coupon idea!  :)

Monday, September 12, 2011

MPS Pinkalicious Blog Hop- Back to School

Hello everyone!  I am so proud of myself for posting 2 days in a row!!! :)  Before I get to my project for today, I want to say a huge "thank you" to Diana @ http://dianamlarson.blogspot.com/ for passing the Butterfly Blog Award to me!!!!  Her blog is amazing, she is a wonderful bloggy friend, and I really do appreciate her thinking of me!  Check out her blog, you'll be happy that you did!  Thanks again Diana!!! :)  Okay...  I wanted to make sure that I was able to get in on the MPS Pinkalicious Blog Hop this month, but it took me a while to come up with an idea...  The challenge was to create something with a school theme, BUT it couldn't be a card or scrapbook page...  You all know that I LOVE making cards, so this was a chance to think outside the box... and that's exactly what I made:  a box!  This is a treat box you can fill with goodies and pass it out to other teachers (co-workers), your child's teacher, etc...  I love the little miniature clipboard on this and that cut is actually the reason I bought the Fabulous Finds cartridge!  :)  Here it is....

MPS Pinkalicious Blog Hop- school theme
Bitten by the Bug 2- TBBM 3D box
Blog Quick Quotes (CWC)- Back to School


Tags, Bags, Boxes & More- box cut at 5.12"
Fabulous Finds- clipboard cut at 5"
Doodlecharms- apple cut at 1.28"
Hero Arts- Friends stamp set
Grid paper 4 1/2 x 2 3/4", I punched holes down the side with my Crop-a-Dile
Twine
Glossy Accents

There you have it folks!  I kept it pretty simple, so it would be easy to make multiples of...  Hope you have an A+ day!!!  :)

Sunday, May 29, 2011

Dog Mini Album- Part 2

Hey there!  I hope everyone is enjoying their 3 day weekend as much as I am! :)  Yesterday I went and hung out with a couple of friends, and today I've been working on a yearbook for my students.  I can't believe another school year is almost over!!!!  Anywho, here are the next couple of pages from my mini album.   


I wanted these two pages to show off pictures of my dogs when they were puppies.  For the dogs I used the Create a Critter cartridge, both are cut at 2".  The white dog is actually the dog in the booklet wearing the fire helmet, so I had to round the top of the shadow off (with my scissors) to get rid of the hat.  I hid their faces on my Gypsy, and then stamped faces for them using the Peachy Keen Critter Faces- medium.  The titles are from the Alphalicious cartridge.  They are cut at 1.94" and I used my Gypsy to weld them together.  I embossed them with the same sparkle embossing powder and then covered them with Glossy Accents.  The pockets measure 4 x 6", the layers for the pockets are 3 3/4 x 5 3/4".  I added eyelets with my Crop-a-Dile and brown ribbon.  The tags inside the pockets were cut from Tags, Bags, Boxes and More at 3.25 x 6.25".  I added ribbon scraps to the ends of the tags and stapled them into place.  I put two tags in each pocket and used them for puppy pictures and journaling.  Whew!  That's a lot of explaining...  Hope you likey!!! :)